
Connect Claude to ChecQR
What the ChecQR MCP server is
The ChecQR MCP server is a connection that lets AI assistants, such as Claude, ChatGPT and Microsoft Copilot, read and edit a ChecQR organisation on your behalf. The assistant uses the same permissions as your ChecQR dashboard account: it can only reach the organisations you belong to, and it can only do what your account and your organisation's settings allow.
Once connected, you can ask Claude in ordinary language to look through checklist results, compare documents with your checklists, change checklists and questions, or build new checklists.
The ChecQR MCP server address is:
https://mcp.checqr.net
Before you start
You need:
- A ChecQR account. Claude signs in with your existing ChecQR dashboard login. It can only reach organisations your account belongs to.
- AI access turned on for each organisation. An administrator turns this on in the ChecQR dashboard under Settings → Account Options → AI access:
- Read only: Claude can view checklists and results but cannot change anything.
- Read and write: Claude can also create and edit checklists, questions and other settings. Changes can only be made by users who are an owner or admin of the organisation.
- Disabled: Claude cannot use the organisation. If you ask it to, it reports that AI access is not enabled for that organisation.
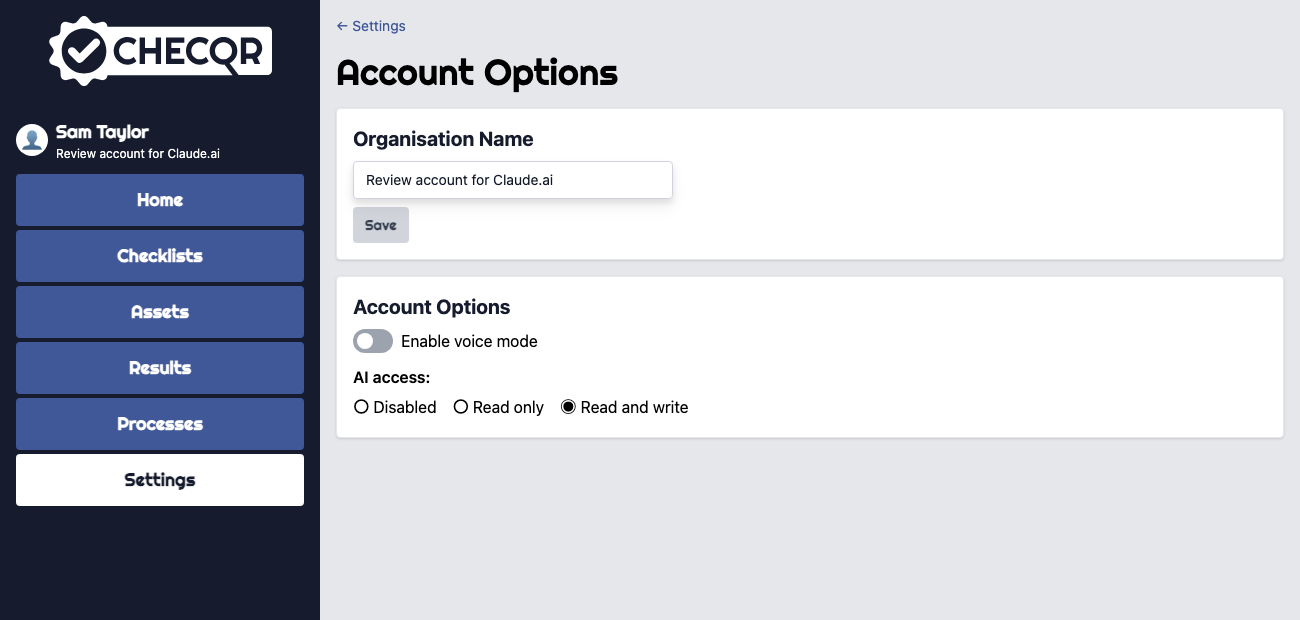
If your organisation is part of a portal, AI access may be set by your portal administrator, and the setting cannot be changed in the organisation.
Connect from Claude (claude.ai, Claude Desktop and Claude mobile)
A connector added on claude.ai is also available in Claude Desktop and the Claude mobile app.
If ChecQR is listed in the Claude connectors directory
- In Claude, open Settings → Connectors.
- Select the Discover tab and search for ChecQR.
- Click Connect.
Adding ChecQR as a custom connector
If ChecQR does not appear in the directory, add it yourself:
- In Claude, open Settings → Connectors.
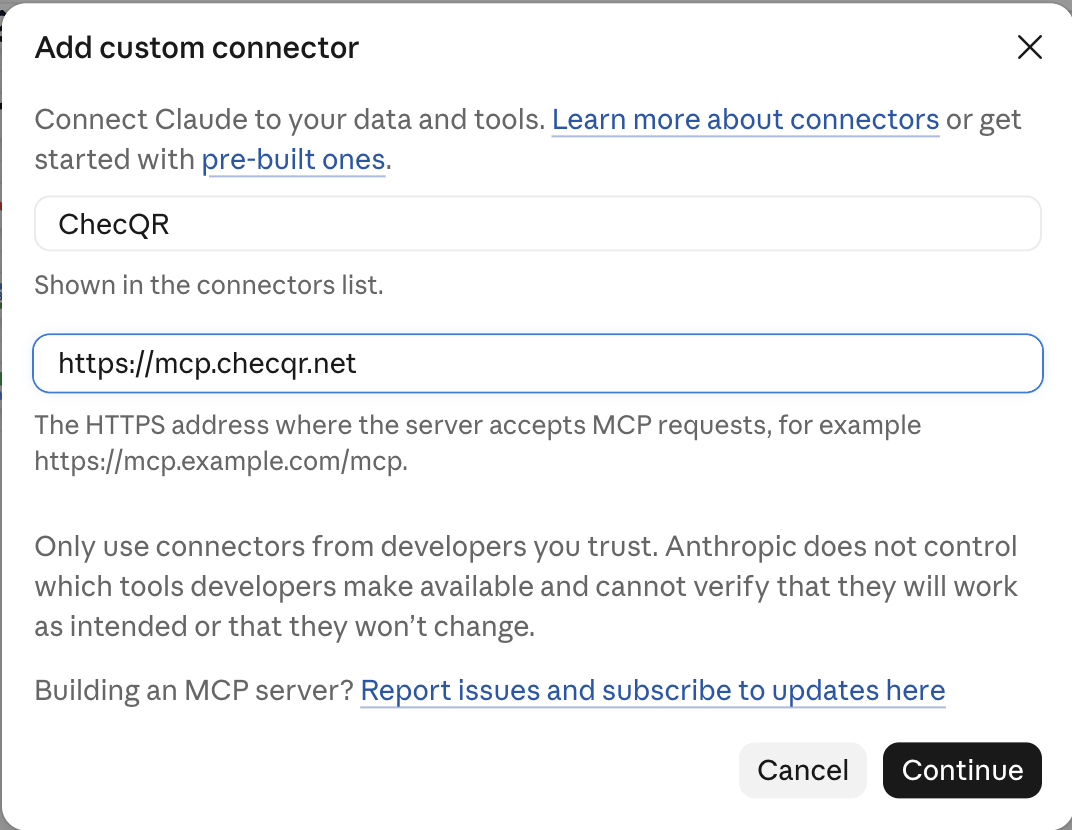
- Click Add at the top right and choose the custom connector option. The Add custom connector dialog opens.
- Enter the name ChecQR in the first box and the URL
https://mcp.checqr.netin the second. Enter the URL exactly as shown, without/mcpon the end. - Click Continue.
Signing in and authorising Claude
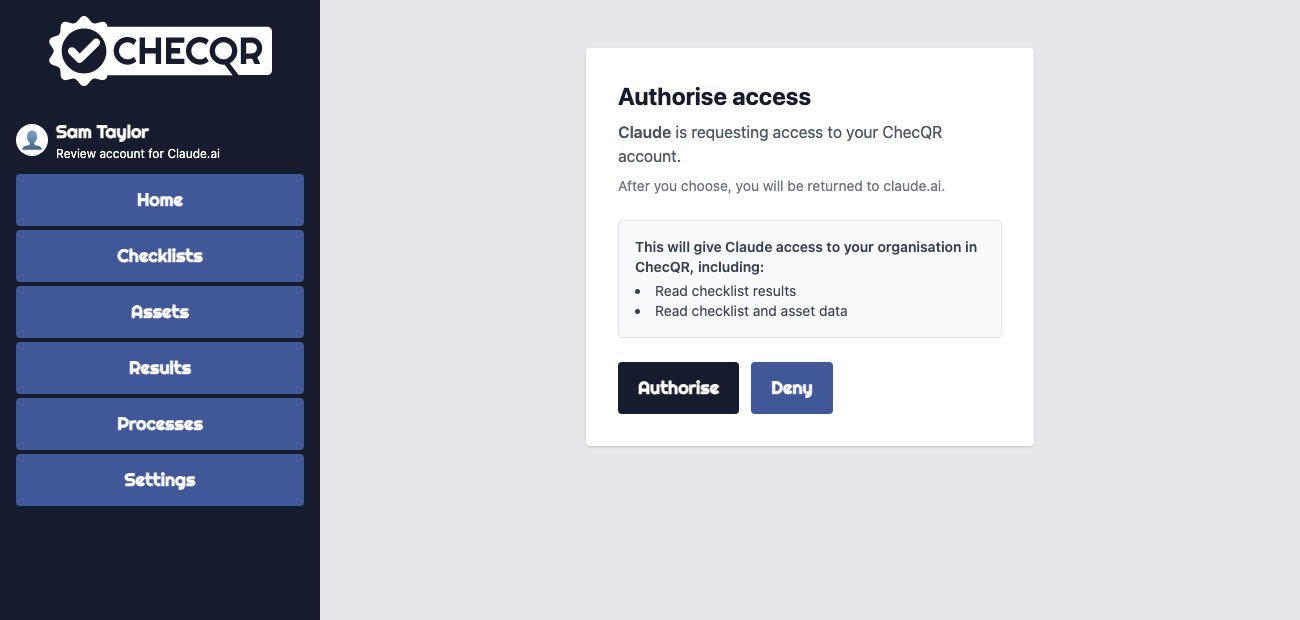
When you click Connect, Claude opens the ChecQR dashboard at the Authorise access page.
- If you are not already signed in to the ChecQR dashboard, sign in with your usual ChecQR login.
- The page shows which application is asking for access and the site you will be returned to (claude.ai).
- Click Authorise to connect Claude, or Deny to refuse.
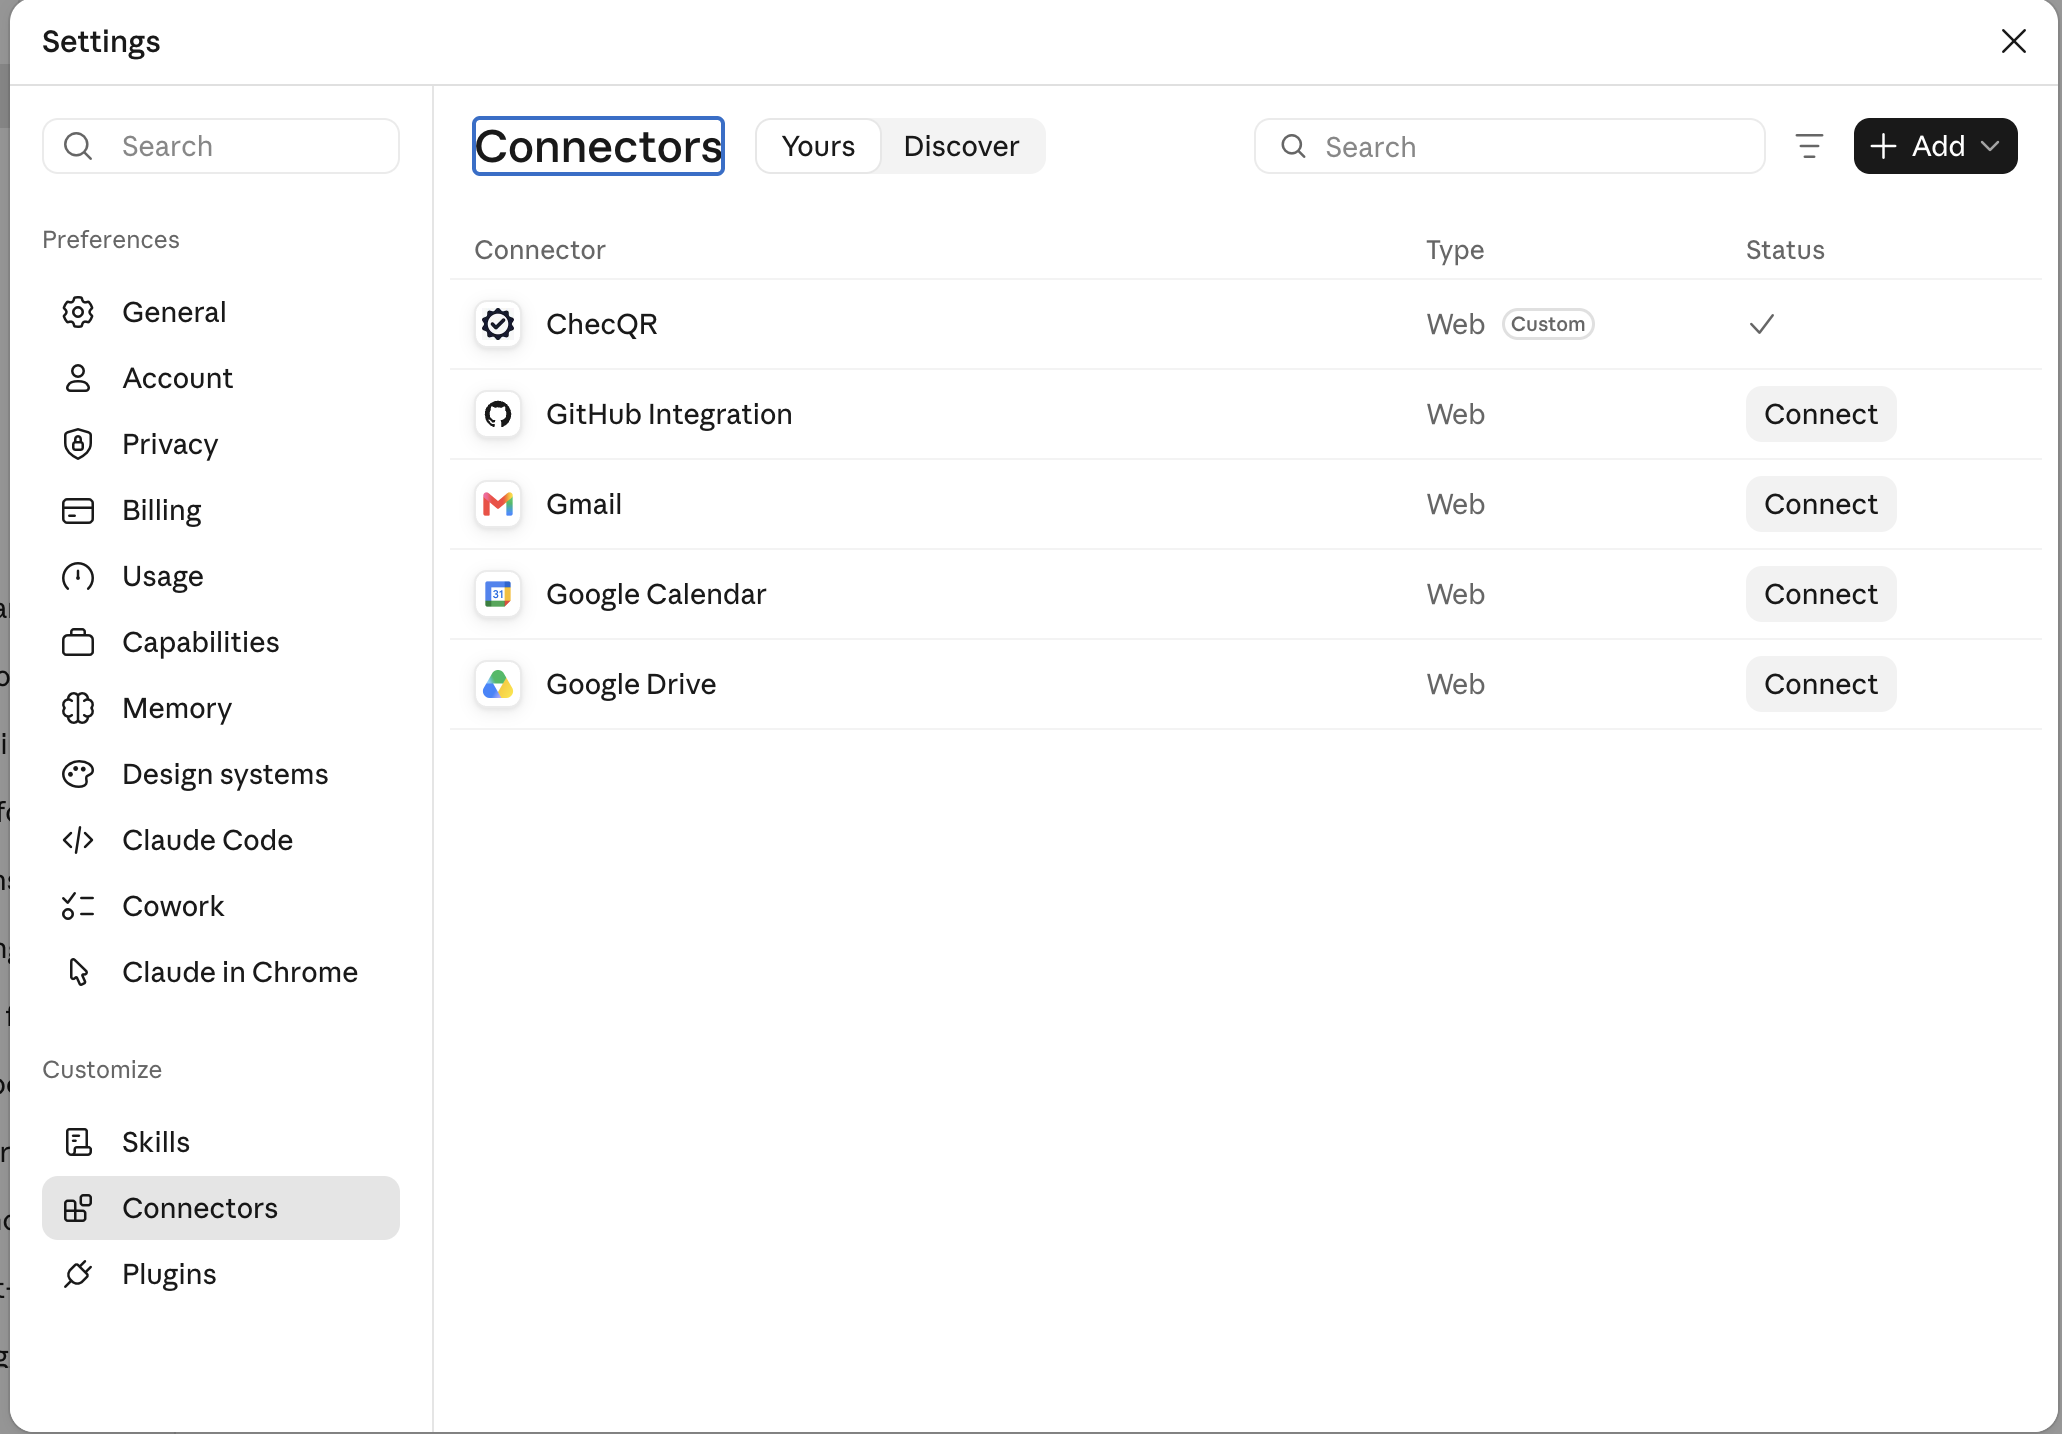
After you click Authorise, you are returned to Claude. ChecQR appears under the Yours tab of Settings → Connectors with a tick in the Status column. A connector added by hand is labelled Custom.
The organisation that is selected in the ChecQR dashboard when you click Authorise is the one Claude works in to begin with. To start in a different organisation, switch to it in the dashboard before connecting, or ask Claude to switch afterwards (see below).
Connect from Claude Code
- In a terminal, run:
claude mcp add --transport http checqr https://mcp.checqr.net
- Start Claude Code and run
/mcp. - Choose checqr and follow the prompt to sign in. Claude Code opens the ChecQR Authorise access page in your browser; sign in if asked and click Authorise.
Example uses
The examples below are requests you can type into Claude once ChecQR is connected. Claude reports what it found or changed; check its answer before relying on it.
Compare management system documents with your checklists
Upload a document, such as a HACCP plan or an ISO procedure, and ask Claude to compare it with your checklists to find checks that are missing or out of date.
Here is our HACCP plan. Compare each critical control point with our ChecQR checklists and list any control point that has no matching check, or where the limits in the checklist differ from the plan.
Read this cleaning procedure and tell me which tasks are not covered by any ChecQR checklist.
Search checklist results for specific answers
Which fridge temperatures were above 5 °C last week?
Show every delivery where packaging was damaged.
Which checklists were not completed on time yesterday?
Claude can read each answer, including notes added to answers and the alerts they raised.
Make many edits at once
With Read and write access, Claude can make changes across many checklists and questions in one request.
Rename the question "Cooler temperature" to "Fridge temperature" in every checklist.
Make every question in the Kitchen opening checks checklist required.
Add the question "Are the fire exits clear?" to every opening checklist.
Before a large change, ask Claude to list what it is going to change and confirm before it goes ahead. Each change is recorded in the checklist's Revision history under your email address, as it would be for a change made in the dashboard.
Build a new checklist from a description
Create a checklist for the morning fridge checks, due Monday to Friday between 08:00 and 10:00, with a temperature question for each of our three fridges in °C, an alert if any reading is above 5 °C, and a follow-on question asking what action was taken.
Create a monthly fire extinguisher inspection checklist with a yes or no question for each extinguisher on this list, due every calendar month.
Switching organisations
If your ChecQR account belongs to more than one organisation, Claude starts in the organisation that was selected in the dashboard when you authorised it. To work in another organisation, ask Claude, for example:
Switch to the Bristol site organisation.
Claude lists the organisations your account can reach and switches to the one you name. AI access must be turned on for that organisation too.
Disconnecting
To disconnect ChecQR from Claude, open Settings → Connectors in Claude, select ChecQR under the Yours tab, and remove it. In Claude Code, run claude mcp remove checqr.
See also Using AI assistants (MCP) for other assistants, and Get help if you have a problem connecting.